I have been keeping bees for over a decade
and I still make lots of mistakes.
This year I hope to do better.

August 1 report

August 2nd, 2010

I have been a little worried about the bees. July was very hot for most of the month. I lifted the telescoping cover and put a small stick to hold it open so that the bees would have plenty of air circulation. The bees liked to beard the front of the hives and when I lifted the lids they hung out on the top of the inner cover and enjoyed the shade and the breezes. The temperatures have dropped down to the 80s during the day and into the 60s at night so the covers are back in place.

Watching the hives I did not see any bees returning with pollen for most of July and I was worried that they were hungry. I have heard about hives starving in July and August. There are good bee flowers in the fall around here. I hear golden rod is good, and I’ve seen bees going nuts on sumac trees. The sumac should start soon.

The hay fever plants like golden rod, rag weed and queen anne’s lace bloom starting in late august and last until the killing frosts in October. I think these are good for bees.

I cleaned out my top feeders and stacked them near the house preparing to start feeding.

I woke up Sunday morning, August 1st, with horrible hay fever allergies and have been taking pills since. My head is all stuffed up and it means that the fall allergy flowers bloomed over the weekend.

The bees are now returning to the hive with baskets of yellow and orange pollen. I am guessing that I won’t have to feed them. I was prepared to start the feeding, but I think now that the fall flowers are starting up and the bees will be able to replenish their food supplies. They may have used up some stored honey in July for a few weeks, but they are back at work gathering food.

I have four hives. One I robbed in the spring and they are slowly refilling the supers. One is a Russian hive and grows slowly. The supers in the Russian have some honey and are well drawn, but there is not enough to harvest. The two new hives that I started from packages in April have lots of honey in the supers and I will harvest about 30 frames as soon as I solve the problem of the honey extractor.

As far as the honey extractor goes, I am still going to make one of my own. The disaster of the last one is still with me. I don’t want to use the crush and strain method again. It took 4 or 5 hours to get a few gallons of honey.

I have sold about $50 worth of honey from the roadside sign. I hope to sell lots more and everyone I know will be getting honey for Christmas.

Quick Hive Inspection

July 10th, 2010

It has been mostly raining today, but it cleared up and the heat is not as bad as it has been, although it is still in the 80s with high humidity. I decided to pull the tops just to see how the girls are doing on the top super.

Martha, my weak hive, had lots and lots of bees, which surprised me as she has only a few sitting on the front porch. She has moderate activity with workers coming back with baskets of pollen, but nothing like the other hives. The inner cover was dense with bees and when I pried off the inner cover there were lots of bees in the top super. There were two drawn and capped frames, but the rest was empty. This is disappointing. The last time I looked, a month ago, they were working on those two frames, and I expected to see more done.

I had put two empty supers back on Connie after I robbed her honey. This was last May 23 or abouts. The chopped off wax in the top frame had been mostly repaired with some new comb, but no capped honey was to be seen. I expect that since I put the two empty boxes on they had been working on the lower super. They were irritated with me and started to get uppity so I closed her up without digging down deeper.

The other two hives, Justine and Ethel, are the packages that I installed in the beginning of April. These are very successful and very “hot”. They each have three supers. Justine is less active than Ethel, so I popped her top. The top super was waxed to the super and I was pulling up frames when I pulled up the top. The top super was almost fully drawn and filled with capped honey. I did not bother with Ethel as she is very populous and aggressive. I don’t want to be attacked. I figure her to be the same as Justine, only more so.

I guess it’s time to harvest. I don’t have any more spare supers or I would put them on these two hives. I haven’t gotten a working extractor built and I don’t have the cash to buy one right now. The honey harvest using the scrape and mash method was messy, to say the least.

I have enough for two supers and 20 frames. I will order these and hope that they come by the end of the week so I can paint them and put them on next weekend.

Selling Honey

July 10th, 2010

I have some 12 and 8 oz bears. I made a label and Erica made a sign. I am waiting for our first customer. We have a bad road with heavy traffic. People speed here so it is hard to stop. I hope we sell some.

Honey Makes You Popular

May 26th, 2010

I gave away a few of the baby food jars of honey. The overwhelming response has been More! More! I am not sure how the word got out, but I could sell my entire honey crop at work if I wanted.

So far I have been giving away the free samples to friends. I have not sold anything yet. It seems a wrong to part with the golden stuff for mere cash. The bees worked so hard to make it and I had so many sleepless nights worrying about the hives. I want to keep the stuff forever.

I have decided to sell it for $6 a 12 oz bear. This is high, but it is not as high as the organic honey in the health food stores. If people think it is too much, then let them go down the street. It will be hard giving the stuff up. I should get upwards to $120 if I sell it all. Not much, but a good start to paying for all the bees and their houses.

Next step is to paint a sign.

Sticky Time

May 24th, 2010

My homemade honey extractor failed badly. It turns out that my drill, which I used to spin the frames, is one speed – fast. I should have used a variable speed drill and spun the frames at a slow to medium speed. As it turned out the thin metal that I used twisted up into corkscrew when I tried to spin the frames. Back to the drawing board.

The problem then was that I had 15 frames full of honey that I was going to spin. I uncapped several frames and set it to drain, but the honey doesn’t drain, I think by design. The honey stays in the comb and that has to do with the viscosity of the honey and the size of the comb.

I then scraped off the comb and spent a few hours squeezing honey out of the chunks through cheese cloth. I now have 2-1/2 gallons of honey. That’s 12 bears, 20 baby food jars (as samples for friends), and a couple of mostly filled 64 oz containers.

Getting hands on with the honey this way gets it all over you, your clothes, your hair and everything within 10 feet. I spent an hour cleaning up and there is still puddles of honey out on the driveway where I stored the equipment after I had finished. Even after two hot baths I still feel sticky.

I returned some of the demolished frames to Connie, the hive that I robbed. The rest I have in spare supers. I need to pile these on the other hives so the bees can clean them off.

I have ordered a Honey Sign and more bears. I have to get this stuff out of the house. I ingested quite a bit of honey yesterday and I am feeling a bit queezy.

Weekend Report

May 17th, 2010

I worked on my Honey extractor a few hours this weekend and I have some pictures. I am about half done. I got into a situation where the bolts holding the bottom to the trash can are not waterproof and I decided to use some silicon caulk to seal it, but Erica doesn’t want any honey exposed to the chemicals so I am going to pick the caulk all out. I may have to rebuild it with rubber gaskets.

The bees are all doing well except for Martha.

The new hives, Ethel and Justine, installed on April 9, are doing very well. They are very enthusiastic with huge numbers of bees. I haven’t opened them since the smoking I gave them on May 1st, but I am assuming that the queens are thriving. A honey bee in the summer lives 28 to 35 days so anything that was in the box when I installed them are now dead. These all have to be new bees.

Connie is equally exuberant and I need to split her soon. She is half Russian, and she will want to swarm unless I split her.

Martha, I think, reacted badly to the smoking I did on May 1. A few days later they were all bearding the front of the hive and I think they absconded.  There are lots of bees left, but I peeked inside and the hive is not that full. I am hoping that Martha will force a queen and in a few weeks recover. I have been feeding her sugar syrup. I will suit up one of these nights after work and open Martha for a good look at her insides.

My plans are to finish the honey extractor and pull the top super from Connie, which weighs about 30 pounds with capped honey (left over from last year). I’ll pull any capped frames from the super under that and any capped honey frames from the deep box under that. I will also check the new hives, Ethel and Justine, for capped honey.

My goal has been to split Connie on Memorial day, but I may do it next weekend. She is way too successful not to swarm, so I want to beat her to it.

This will be a simple walkway split.

1) I will set up an empty hive and base right next to her. I’ll make a foundation the same height as Connie’s. I’ll loosen all the boxes with the hive tool.

2) I will take off the supers and replace the cover.

3) I’ll smoke the top of the hive to drive the queen downstairs. I’ll also knock on the lid and scare them all downstairs. Over the winter and into the Spring, the hive usually moves to the top box and hangs out there. I’ll put in the entrance blocker to try to keep the swirling bees to a minimum.

4). I’ll quickly put the second story deep body, full of brood, but without the queen, onto the empty body.

5) I’ll lift the bottom body of the original hive, hopefully with the queen, and put it on an empty deep and move the pair onto the old base. (If the hive is too heavy, I might leave it where it is and put the empty deep on top.)

6) I’ll put the supers back on, and take out the entrance blocks. If the bees are too active, I’ll wait a day to put the supers back.

What I want to accomplish is to move the active hive upstairs with an empty downstairs. All this room will let the queen think that there is no need to swarm. I want the old top box where the queen has been living and laying to the top of the new hive and move the old downstairs, hopefully with the queen, upstairs on the old hive position. I think that the smoke will drive the queen down to the bottom box, which is where hangs the tale.

Worst case, the bees will figure it all out, find the old queen and inhabit one hive. This is a tie for me as it is about the same as a swarm, but they new hive will be more roomy downstairs and they may not swarm.

If I don’t get the queen in the right box, this is the same situation, except there is a chance that the queen was laying eggs downstairs and I still might get a new queen.

The split might fail, but I’ll still have at least one  good hive, unless the queen leaves in disgust, in which case there is still brood in at least one of the boxes for a queen.

I am hoping that there will be swarm cells hanging off the bottom of the frames so that the new queen will appear fast. I don’t want to crush them, though when I move the boxes.

DIY Honey Extractor Getting Started

May 6th, 2010

I went to Lowe’s over the weekend to buy some plants for the yard. While I was there I started buying parts for my Do-it-yourself Honey Extractor. I am trying to keep the cost under $75 for everything except the tools. If you don’t have a drill, metal shears, and a screwdriver this project will cost you more.

I bought a medium size plastic garbage container. It is about 24 inches in diameter and about 30 inches deep. I could have bought a galvanized steel garbage can of the same size for a little more. It is up to you, but I am going as cheap as I can.

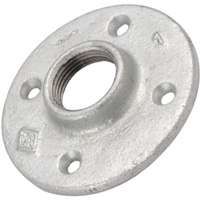
I bought two 3/8″ Galvanized Floor Flanges. I need these to hold the central axle which is a three foot length of 3/8 inch threaded rod.

Floor flanges look like this:

As you can see, it has a place to screw in a threaded pipe, and a flat bottom to attach it to things.

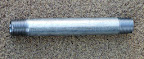
A short length of 3/8 threaded is called a nipple. I bought two 2-inch 3/8 inch nipples. Nipples are what plumbers call a short length of threaded pipe.

I will screw the nipples into the flanges. I will then attach one to the center of the garbage can lid and one to the bottom of the can.

Since I will be using the flange and nipple to hold the threaded rod steady, I need some kind of metal shield or “strike” under the bottom flange in order to keep the threaded rod from drilling into the plastic bottom of the can and eventually punching a hole in it.

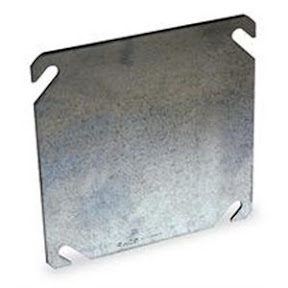
I bought the cheapest piece of steel that I could find, which is an electrical box cover. I wanted to get the round box, but they all had a knockout in the center and I didn’t want to have the rod break through it. This is what I bought:

I will place this under the flange so that the rod rests on it. It will also give added stiffness to the bottom flange so that the force of the spinning frames doesn’t rip up the thin plastic of the garbage can.

I bought a box of 3/4 inch 10-24  machine screws and nuts to hold this all together. 10-24 screws are about 3/16 of an inch. They will fit well into the hole from a 3/16 inch drill.

I have to drill 4 holes in the box cover and then drill 8 holes in the bottom of the garbage can and attach the parts to the bottom of the can using the machine screws.

I will attach the other floor flange to the top of the lid in the center. I might use another electrical box here also to add stiffness.  I will have to drill a 3/8 inch hole in the center of the box and the lid so that the rod can go through the lid and stick up.

I will file down the top of the threaded rod into a square shape (don’t worry, I’ll have pictures). This will make it easier to attach my drill to it so I can use the drill to spin the frames.

One night this week, or Saturday if I have time, I will get this part done and take pictures.

The frame holders will be made out of galvanized sheet rock bead. I am not sure it will be strong enough, so I will hold off until I get it working before I do part 2 of this project.

I think that I can use heavy duty large rubber bands to hold the frames steady while they spin. Think cheap. I have a super full of honey just waiting to try this baby out.

One last thing – I bought a honey gate from http://www.blueskybeesupply.com/ on eBay. It only cost me $10 with free shipping. You can buy a plastic 1.5 inch valve from Lowe’s that might do as well, but this is threaded and looks like it will be easy to insert into the garbage can. They have them on the website and their prices are low for most things (but not everything so compare). You might order more stuff to get a better rate on shipping. Every time I go back to the website there is more stuff.

May 1st Bee Check

May 1st, 2010

I have been nervous about checking the bees since I was stung so often the last few times that I opened the top feeder to add sugar syrup. I dug out my pair of size 13 Frye boots and put on my bee suit.

I set the smoker up with a little newspaper to get it started and lots of Pine straw. Pine straw is great for smoking. It is the dried pine needles under my White Pines. I should package the stuff and sell it to beekeepers. It smokes like crazy and the bees seem to hate the acrid smell.

I smoked up my suit to keep the bees off me. This is a trick I learned from talking to an old beekeeper on the phone last summer. It really works.

I pulled off the lid of Martha and gave her some smoke and waited a few seconds. I then took off the lid and smoked under the inner lid and then lifted the top feeder and gave her some more smoke. I was worried that I was smoking her too much so I stopped then.

When I lifted the top feeder there was bridge comb that held the top to a couple of frames that wanted to lift up with the top.

I put the top deep on Martha towards the middle of March and it was 75% drawn and much of it had capped honey. I put the queen excluder on the top and covered that with a medium super with some partially drawn comb. I put her back together.

I went to Connie next. Connie has been bitchy, but with a few puffs of smoke there was no problem. Connie had the medium super that I left on last winter because I was afraid that she would starve because of the bad late summer and fall that we had. The super seemed to weigh about 40 pounds. It probably weighs less, but I had a tough time lifting it. It was packed with capped honey.

I put a queen excluder down and a medium super and put the full super on top. I will come back soon to harvest it, but I have to build my honey extractor first.

Next were the two new hives that I installed as packages on April 9. it has been 21 days and by my count this is the earliest that the brood could be coming out. They are fairly aggressive when I feed them, but the smoke did its job. I have been concerned about Ethel as she has half as many bees in front as Justine. I opened her up first and again the top feeder was glued to the middle three frames. Ethel is two deeps. The top deep was all new black Perco frames and 5 frames were almost fully drawn and full of uncapped honey. I lifted the top deep and the center frame of the bottom hive was full of brood. Yes!

Since Ethel’s top deep was drawn so well I put a queen excluder on top and a medium super with some partially drawn frames.

I went to Justine and it was the same story. There were lots of bees. It seems that there were many more than I could have possibly shook out of the package. Maybe I have my calculations wrong and the brood have been emerging. Again there was good comb on the black Percos and I put a queen excluder on and a medium super.

I have now 4 supers that I might be able to harvest at the end of may and one that is already full that I will use to test my honey extractor when I make it.

The flowers are going crazy here and there is lots of nectar. The top feeders still had some sugar in them, but I will mix up some more tonight or tomorrow and feed them in case we get some rainy days. The weather looks, good, though and I think the bees are doing much better than I thought they would.

I will sleep better tonight.

Spring activity

April 24th, 2010

This is April 24, 15 days after the bee packages were installed. The new hives, Ethel II and Justine, have calmed down a lot, but I am still being stung when I take the top off to feed them. I’ve never had this problem before.

Martha and Connie are strong. Martha, the Russian hive, is doing very well. I am still amazed that such a small ball of bees in February is a full hive in April. Connie, the hybrid Russian Italian is going like gangbusters and will want to swarm soon.

Here are the vids.

Ethel II and Justine.

Martha.

Connie.

Designing a Home Made Honey Extractor

April 16th, 2010

I want honey this year and that means extracting honey. You can make chunk honey and let it drain or you can use a spinner. The advantage of a spinner is that the comb is kept mostly intact.

Comb takes as much as 10 time more sugar to make than it takes to make honey (one source says 17 times as much sugar). A pound of comb could have been 10 pounds of honey, so it make sense to preserve the comb as much as possible in order to return it the hive. The bees will then fill up the old comb rather than have to draw new comb at the expense of making honey. Reuse of comb means more honey.

The chunk honey method is to just chop up and mash the comb and set it in a colander and let the honey drain out. Then you can process the beeswax. You then filter the honey and you are done. You do this if you can’t afford a honey extractor.

Spinning requires a honey extractor. The cheapest extractors cost around $200. There is a guy who is making a spinner that you attach to a drill that can spin a couple of frames, but he charges $140 for his.

I have been planning my do-it-yourself extractor based on a few old magazine articles and I think that I can do it for under $50.

What you need for a honey extractor is a clean garbage can. Rubbermaid has a good variety at the local Home Depot. You need a central rod that you can drive with an ordinary drill (think 1/4 inch threaded rod). You need a base to keep the rod from cutting through the bottom of the garbage can (think galvanized pipe fittings). You need a brace at the top to keep the thing steady and then you need a way to attach the frames to the the rod so that they are held out from the center when they spin. It should be easy to flip the frames so that you can do both sides without taking the thing apart. I am thinking about using galvanized strapping for braces and holding the frames, but I am not sure it will be stiff enough. I will have to experiment with that part of it.

Stay tuned. I am going to start buying the parts this weekend. Maybe by next week I will have the first prototype working.


Bee Progress Home


Copyright 2009, 2010 by Keith P. Graham